As a blogging platform owned by Google, Blogger/Blogspot offers a completely free web hosting server that enable registered user to publish blogs and websites which can be easily discover and access anywhere in the world.
 |
| Install Custom Template On Blogger |
The Blogger/Blogspot platform has a lot of features and designs that enables user to customize blog to their unique taste.
One of these features supported by Blogspot is that blogger using this platform can easily take a backup, edit or change the current template in less than one minute as many time as possible.
As a webmaster it is very important to note that template/theme play a major role in the actual design and responsiveness of a blog or website, also there are templates that are particular appropriate and attractive for certain blogging niche. In today article I will walk you through the easy step by step guide to install a custom template on blogspot blog in 2023.
How To Install Custom Template On Blogger
There are majorly two known method of installing template on blogger. First download a suitable theme (XML extension) for your preferred niche, there are a lot of websites that provide free blogger template but I strongly recommend getting a premium theme so as to have full access to its documentation.
You may want to read this post :
Also to avoid having an encrypted code that might affect the blog overall responsiveness and display.
It's highly recommended to always take a backup of your template before making any changes to it.
Method 1. Upload a new theme (.xml file)
This method is quite easy and no coding knowledge is required once you have your template ready in less than one minute you're done.
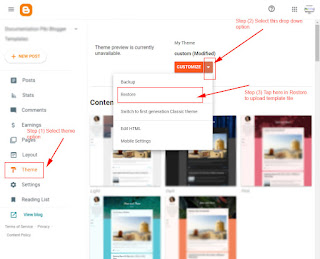
2. Select a blog from the drop-down to upload a new theme (.xml file).
3. Click on the “Theme” tab.
4. Click on the inverted arrow button attached to the “Customise” tab.
5. A pop-up menu will show the “Restore” option. Click on it and upload a new theme (.xml file).
 |
| Upload A New Theme |
You have successfully uploaded the blog theme. It’s all done!
Method 2. Copy & paste a new theme (XML code) in the Blogger’s HTML editor.
We strongly recommend using this method to install a theme in Blogger. It will help you keep all the widgets that come with a new theme and disable widgets of your old theme.
You may want to read this post :
To start with Open the XML document file of the template in Notepad Editor. After that select and copy the entire code in the theme using CTRL+A and CTRL+C respectively. Once that is done, then follow the steps below.
2. Select a blog from the drop-down to upload a new theme (.xml file).
3. Click on the “Theme” tab.
4. Click on the inverted arrow button attached to the “Customise” tab.
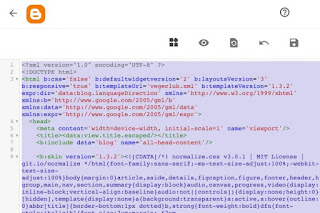
5. A pop-up menu will show the “Edit HTML” option. Click on it. An HTML editor will come up on the computer screen.
 |
| Blogger HTML Editor |
Click anywhere within the code body and press CTRL+A to select the entire code then delete or clear it.
6. Now, paste the entire code of the new template you copied earlier in the HTML editor of blogger.
7. Finally, click on the Save option.
And You're Done!!!
Conclusion
With the simple guides given above, I believe by now you should be able to install custom template on Blogger without any hassle. For questions and additions kindly engage us in the comment section below!
And don't forget to share this article with your friends remember sharing is caring.
That's All
Thanks for reading our blog
Have a great day ahead!😍
© TechBrainaic
All right reserved


